Monday, December 28, 2009
Don't throw away those Christmas Cards!
Do you look forward to going to the mailbox around Christmas time? Do you love seeing how friends and family members have grown? Well a friend of mine had a wonderful idea. After you take down your cards put them in a file folder. Keep the folder by your phone and take out one card/picture a day or week. This will remind you to pray or think about that specific family. I am excited to start doing this in 2010!
Wednesday, December 23, 2009
5 Minute Fudge!
Ingredient
- 1 (12-ounce) bag semisweet chocolate morsels
- 9 ounces (3/4 of a 12-ounce bag) butterscotch morsels
- 1 (14-ounce) can sweetened condensed milk
- 1 teaspoon vanilla extract
- 1 (8-ounce) can walnut halves
- 1/2 cup (a couple of handfuls) currants
- 8-inch cake pan, lightly greased with softened butter
- Candied cherries, red and green, for garnish, optional
Directions


Place a heavy pot on the stove and preheat it over low heat. Add chips and milk and stir until chips are melted and milk combined. Save the empty condensed milk can. Stir in vanilla and remove fudge from heat. Add nuts and currants and stir in immediately.


Cover empty condensed milk can with plastic food wrap and center it in the greased cake pan. Spoon fudge into pan around can, making sure to recenter can if it drifts.

Christmas Keepsake
I love making keepsake ornaments around Christmas time. I am hoping to make these hand print ornaments until the boys are at least five. They make wonderful Grandparent gifts. I make 6 sets and keep one set for the boys to keep when they move away..eeekkk. I don't even want to think about that!
Here is the recipe. I found it on the Internet last year.
Salt Bread Dough
¼ Cup Salt
½ Cup Boiling Water
1 Cup All-Purpose Flour
¼ Teaspoon Vegetable Oil (optional)
Food Coloring (optional)
Pour boiling water in a bowl and add salt. Add remaining ingredients.

Knead dough to desired consistency for crafting. If coloring dough with food coloring, work it uniformly into the dough as you knead the craft dough. Keep dough wrapped in plastic when not in use.
Form the dough into a circle and place hand in the dough until you get the desired print.
 Poke two holes before baking. This will be where you will thread the ribbon.
Bake at 300 degrees for 45 to 60 minutes. Ornaments will puff a little when baked. It may take a little longer to bake. Completed ornaments may be painted, or brush with beaten egg and water mixture prior to baking or a darkened, shiny appearance.

I love how they turned out. We even made cards to go with them. The boys used their handprints to make trees and then used their fingers to paint the ornaments. The were so cute!

The Card


Tuesday, December 8, 2009
Traditions!


and thought I could use it in my classroom. I was sure with 25 little cubbies I could do something for my students. Well, the box never made it to school..it stayed in my basement. This year I stumbled upon it again. I stuffed each box with a treasure for Big G. As we count down to Christmas he gets to open a box.

Keep an eye out for these treasures after Christmas. The box I got was only 50 cents..such a deal!
Wednesday, December 2, 2009
Save some time!
In honor of the holidays I thought I would post some quick time saving tips.
Make address labels for your Christmas cards.
I use these year round. I have every one's addresses saved to a word document. When I need to mail out Christmas cards all I have to do is hit the print button. I try to update my addresses once a year. After the list is updated I print out a hard copy. I can refer to my hard copy throughout the year when I need to send out cards and such.
More labels
Do you need to label your child's cups, bottles, shoes, or clothes for childcare or school? Check out Mable's Labels.
They are the BEST. they don't budge and come off with minimal stickiness when you no longer need them.
Hosting a party or meal?
I am in love with the disposable aluminum baking pans. I mix, bake, serve, and store all in the same pan. It makes cooking and clean up a breeze. You can find them in the baking isle at your local grocery store or at Costco...in bulk!
One more thing
Take all of your kiddos Christmas gifts out of the packages before wrapping...you know the twist ties and such. Fill the toys with batteries and then place BACK in the original box. Wrap up the gift. When your kiddo opens the gift they get to play with it right away and you get to enjoy watching them open more gifts instead of working on taking everything out of the packaging.
Thursday, November 19, 2009
Mail, mail go away...come again another day!
After being fed up with counter clutter I came up with an easy solution....clip boards. I don't know about you but my counters were always cluttered with bills, catalogs, coupons, and more. I found an easy way to organize my families clutter.
I went to office max and bought 4 standard size clip boards for under $2.00 each. and 2 mini clip boards for under $1.00. I searched through my scrapbook paper and found some paper that matched my window treatments. I also found some Mod Podge.
I cut the paper to the size of the clip boards, brushed on a generous amount of Mod Podge and the clip boards were ready to be hung up.
I chose to put mine in the laundry room which is just off of our mudroom.
The clip boards hold the following.
- Family Calendar
- Coupons
- Kid's Schedule
- Bills
- Stamps
I love how they turned out. We no longer have cluttered counters. I am one happy mommy!
Before the boards get covered with our clutter
 Organized!
 I love the mini boards. Below the mini board is a canvas that Big G painted for me.
 Close up of the big boards
 More of the big boards
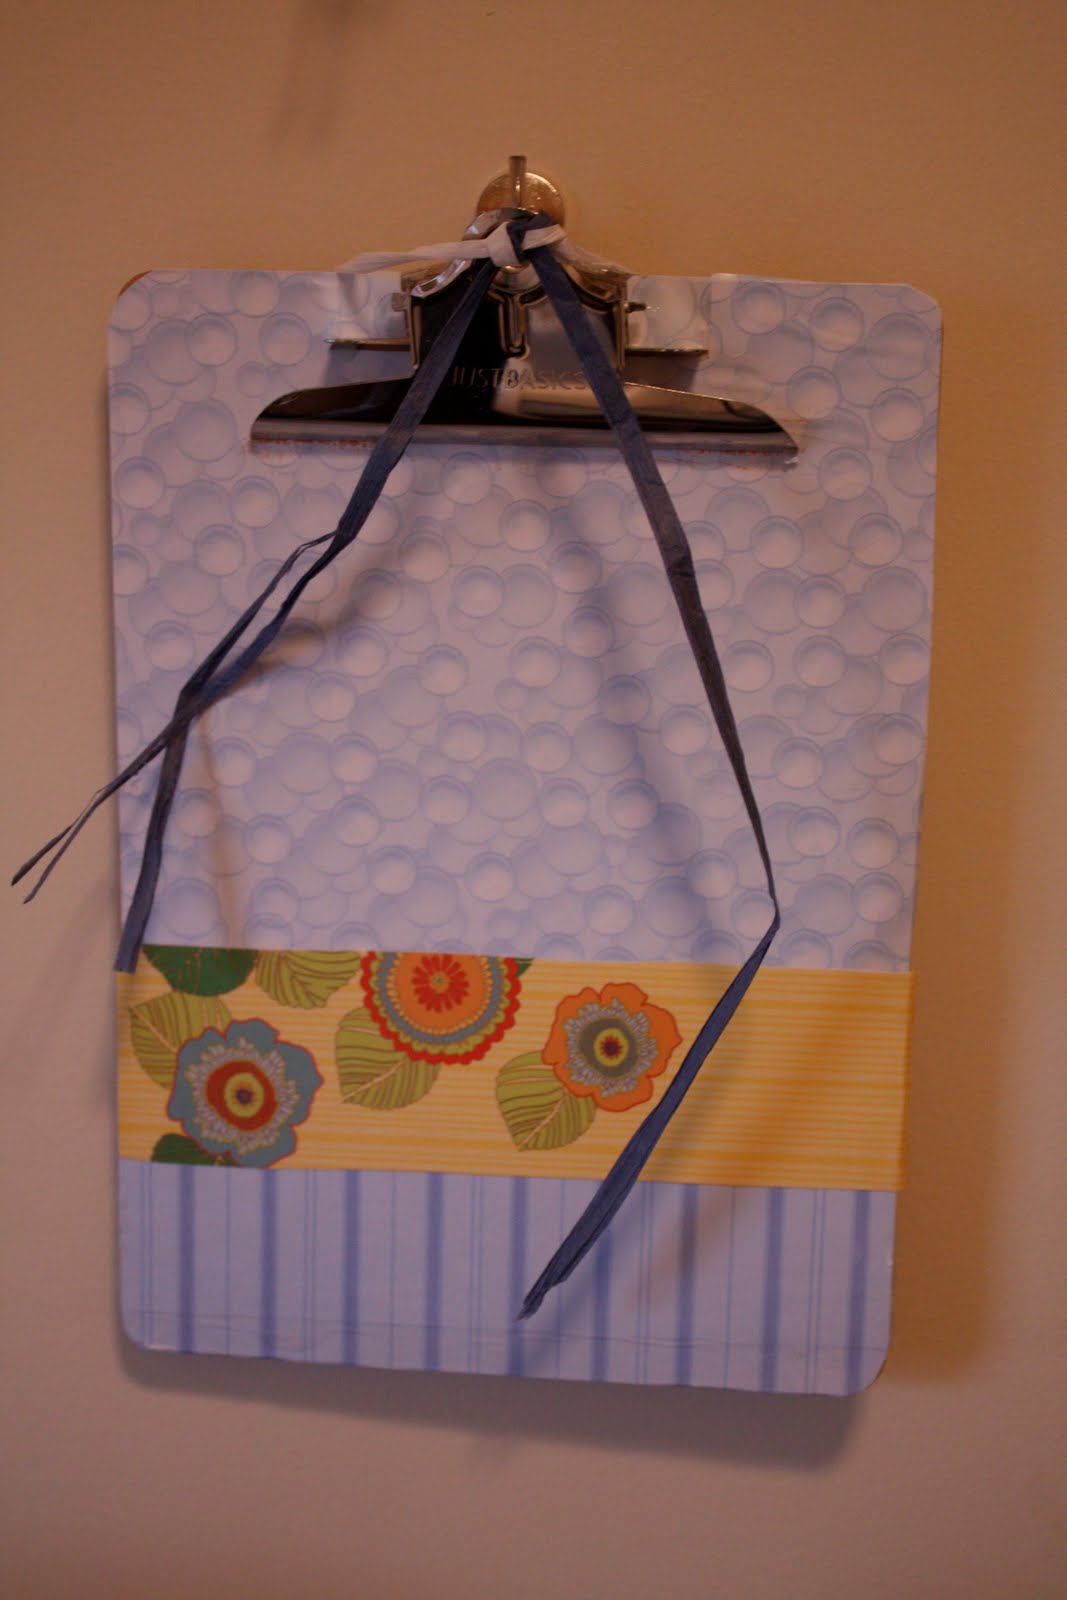 Close up of the mini board.
A friend of mine posted a great tutorial about organizing homework clutter. Check it out. She is also doing a giveaway this week for a wetbag...woohoo.
Tuesday, November 10, 2009
No, you can't get up!
It can be so hard to get Big G to sit at the table during dinner time. I get all of the food ready and served and then he wants to get up from the table. After many power struggles I thought of something that could change dinner time.
You know all of those toy catalogs you get? Well keep them on the table. When your little one wants to get out of his or her chair pass them a catalog. Big G loves looking at the new toys. For some reason these catalogs are so much better than books or magazines.
Dinners have been great since figuring this out. My hubby and I get to enjoy a meal without chasing an active toddler. The bonus is Big G is learning how to sit at the dinner table!
Set the stage. Notice the basket filled with catalogs.
 This is about 10 minutes into dinner
 One happy boy! It's great because he was telling us all about the different toys.
Friday, October 30, 2009
Great learning tools
I had to share our favorite website.
It's great for kids of all and I mean all ages. Big G loves it. When I taught my second graders and parents adored it...give it a try. We try to log on at least once a day. We love the non-fiction books under "I'm Reading"
I just picked these books up a couple of weeks ago. We think they are great. I work on 4 letters a week. Little G loves looking at the pictures and Big G loves working on identifying letters. I bought ours at Target.
Wednesday, October 21, 2009
Toys, toys, toys
Organizing toys made simple! With two kids under 2 years old we have tons of toys laying around. I found a local carpenter to bring my toy storage design to life. The top of the unit is a book browser. The kids can browse the books instead of looking at the spines on a book shelf. I had something similar in my classroom when I taught. The bottom two shelves hold baskets for toys. I took pictures of the toys and attached the pictures to the baskets. The pictures make cleaning up a breeze for your kiddos and husbands. Big G has been cleaning up since 1.5 years old.

Before

After

I took a picture of the toys and attached the picture to scrapbook paper. Then off to office Max. I laminated the pictures to make them more durable. After they were laminated I punched holes and attached the pictures to the baskets. If you don't want to splurge on laminating you can use clear contact paper.
Friday, October 16, 2009
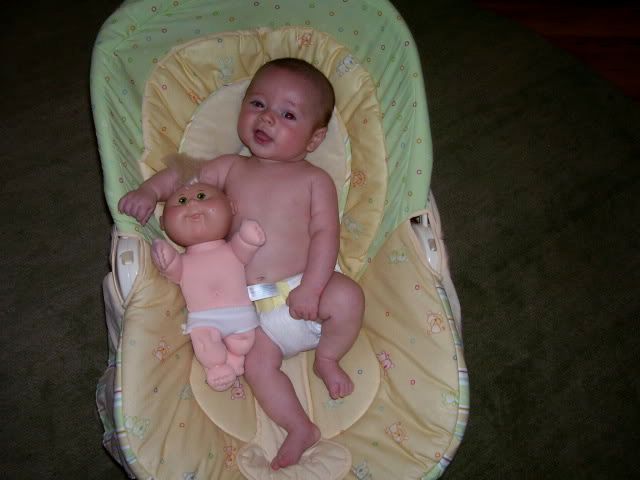
Document your little ones growth!
I started documenting my little ones growth the week they came home from the hospital. With Big G I took his picture in the same chair with the same doll every month. I switched it up a bit with little G. I went to the craft store and bought iron on paper. I designed a onesie for each month and ironed the print onto a 18 month onesie. I am loving how it is turning out. I am watching him grow into the onesie.
Here are some pictures. I would love to post all 12 months of Big G's growth but know that not everyone is interested in looking at tons of pictures. I will post a couple of random pictures of each G man.
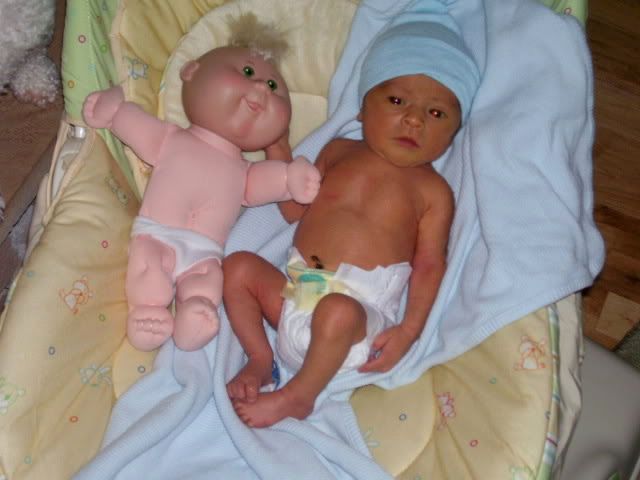


Big G 1 week old
Half way to a year...6 months old
Little G 2 months old


Now 7 months old

Do you document your little ones growth? How do you do it?
Friday, October 2, 2009
Make your own Moby Wrap
You have to check out this blog. I was going to post a tutorial for making your own Moby Wrap but a friend did it for me! I am one happy girl. Check it out
Happy baby wearing. You will never go back to those store bought baby carriers again. Give it a try...I promise that you will love it!
Tuesday, September 29, 2009
Bargain sites that I LOVE!
Everyday I try to hit the following sites.
This one sells out fast. A new steal is posted every morning at 10:00 am. Get there at 10:00 am when they post the first steal. If you get there at 10:10 the steal may be gone.
I love this site because the items don't sell out as quickly as the above site. This site lists there deals until they are sold out. It could be hours or days.
New deal everyday. I have yet to buy from this site.
Wow! This site is so addicting. They list an item and keep it up for an hour. The price keeps dropping during the time. You don't know whether to wait for a cheaper price or buy the item to make sure you can get it. So much fun! This site only runs M-F
A while ago I bought a crib bedding set from http://www.babysteals.com/ .
I loved it and wanted to use it for the boy's bathroom...yes, a crib bedding set for the bathroom. Crazy sounding, I know! Here is the finished product.
I started by painting the bathroom a buttery yellow. After painting the walls I added vinyl brown dots that I bought from a seller on Etsy.
After
Here is what I did with the window valence

The crib bumper was made up of pendents that were strung together. I cut the pendents off of the string and arranged them in circles on a white shower curtain. I don't sew so I used an iron on adhesive. So far so good. The curtain is tied on to the rod using the string that was once holding the pendents together. I cut the string into 5 inch pieces and tied the curtain on to the rod.


The finishing touches were with the personalized towels.


and...the free bathtub shaped basket that was on my doorstep after having Grady. A local group gives you a Welcome Baby gift. I had picked up bibs and burp cloths on an earlier baby steal that matched the bedding. I rolled up the bibs and cloths and placed them into the free basket.


Happy Shopping Ladies. If you have a great site that I should add let me know. I am always looking for a good deal.
Monday, September 21, 2009
As easy as Apple Pie!
In honor of Fall I will post a grown up treat...apple pie!
What you will need:
- 1 recipe pastry for a 9 inch double crust pie (I used store bought)
- 1/2 cup unsalted butter
- 3 tablespoons all-purpose flour
- 1/2 cup white sugar
- 1/2 cup packed brown sugar
- 1/4 cup water
- 8 Granny Smith apples - peeled, cored and sliced

Peel the apples. I used 4 Ginger gold and 4 Honey Crisp

Cut the apples. I only cut 6 of the 8 apples that I peeled.

Look at the yummy apples

Melt the butter

Add 3 tablespoons of flour to the butter..stir well

Add 1/2 cup of brown and 1/2 cup of white sugar to the butter and flour mixture

Add 1/4 cup of water
Bring to a boil and let simmer for 5 minutes

Place pie crust in the pie plate and fill with sliced apples. I only used 6 apples and not the recommended 8 apples.

Cut the remaining pie crust into .5 inch strips
This is a great video on how to make a lattice top for your pie.

Use every other strip of pie crust


Weave the rest of the pie crust..the above video is really helpful

Pour the butter mixture over the lattice top. Do this very slowly

I saved some of the butter mixture. I brushed it over the entire pie

Bake 15 minutes at 425 degrees F (220 degrees C). Reduce the temperature to 350 degrees F (175 degrees C), and continue baking for 35 to 45 minutes.
 This is a really easy and yummy pie. It does not call for many ingredients..I love that about this recipe. The pie was finished before the boys woke up from nap.